
Are you tired of sending documents filled with embarrassing grammar mistakes? Fixing those errors can make your writing clearer and more professional.
Luckily, Microsoft Word has powerful tools designed to catch and correct grammar issues quickly. You’ll discover simple steps to spot and fix grammar errors in Word, so your writing shines every time. Keep reading to learn how to turn your drafts into polished, error-free documents effortlessly.

Credit: www.youtube.com
Common Grammar Errors In Word
Microsoft Word helps catch many grammar errors as you type. It highlights mistakes with red or blue underlines. Understanding common errors can improve your writing fast. Knowing what Word often misses or flags wrongly saves time. This section covers typical grammar issues Word detects and why they matter.
Frequent Mistakes To Watch
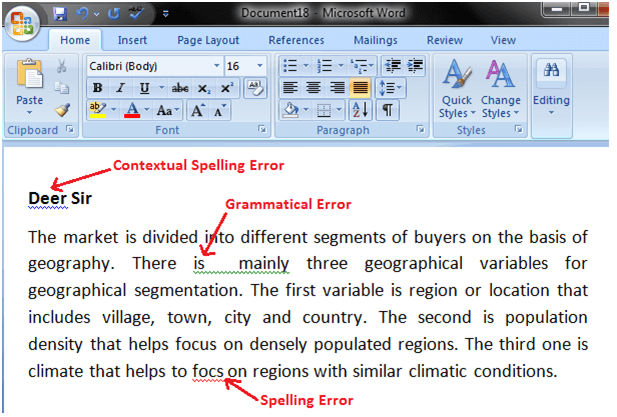
Word often flags subject-verb agreement errors. For example, “He go” instead of “He goes.” It also catches run-on sentences and sentence fragments. Misplaced commas and incorrect use of apostrophes appear often. Confusing words like “their,” “there,” and “they’re” cause trouble too. Watch for inconsistent tenses and double negatives. These errors make your message unclear or confusing.
Impact On Document Quality
Grammar errors reduce the professionalism of your documents. They distract readers and lower trust in your work. Clear writing helps readers understand your ideas quickly. Good grammar improves the flow and readability of text. It shows attention to detail and care in your writing. Fixing mistakes makes documents stronger and easier to read.
Credit: softwareg.com.au
Using Word’s Grammar Tools
Microsoft Word has built-in tools to help fix grammar errors. These tools make writing clearer and easier to read. You can check grammar mistakes while typing. The tools also suggest corrections to improve your text. Using Word’s grammar tools saves time and effort. You do not need to rely on other apps or websites. Understanding how to enable and customize these tools is key to better writing.
Enabling Grammar Checking
Start by opening Microsoft Word. Go to the “File” tab at the top. Click on “Options” near the bottom. A new window will open. Choose “Proofing” from the list on the left. Look for the section called “When correcting spelling and grammar in Word.”
Check the box for “Mark grammar errors as you type.” This turns on grammar checking while you write. Also, check “Check grammar with spelling” to include grammar in spell check. Click “OK” to save changes. Now, Word will underline grammar errors in your document. You can click on the underlined text for suggestions.
Customizing Grammar Settings
Go back to “File” and select “Options.” Open the “Proofing” tab again. Click the “Settings” button next to “Writing Style.” A list of grammar and style rules will appear. You can turn each rule on or off.
For example, you can enable checks for passive voice, sentence fragments, or punctuation. Disable rules you find confusing or unnecessary. This makes grammar checking fit your needs better. Click “OK” to apply your choices. Customizing helps focus on errors you want to fix. It avoids overwhelming you with too many suggestions.
Reviewing Suggestions Effectively
Reviewing suggestions in Microsoft Word helps improve your writing quickly. The tool highlights grammar mistakes and offers corrections. You can decide which changes to keep or ignore. This saves time and makes your document clear and error-free.
Accepting And Rejecting Changes
Microsoft Word shows suggested corrections with underlines or colors. Click on the suggestion to see options. Choose “Accept” to apply the change to your text. Choose “Reject” if the suggestion is wrong or not needed. This way, you control your writing style and keep it accurate.
Use the review pane for a list of all suggestions. It helps to check each change carefully. You can accept or reject multiple changes fast. This feature keeps your document clean and error-free without much effort.
Understanding Explanation Tips
Each suggestion comes with a short explanation. This helps you know why Word suggests a change. The tips explain grammar rules in simple words. Reading them improves your writing skills over time.
Take a moment to read the tips before accepting. This prevents mistakes from being accepted by accident. Learning from these tips makes your writing better in the future. It turns editing into a learning process.
Manual Grammar Corrections
Manual grammar corrections help you improve your writing without relying on automatic tools. These corrections make your text clearer and more professional. You learn to spot mistakes and fix them by yourself. This skill is useful for all types of writing in Microsoft Word. It also helps you understand grammar better over time.
Identifying Errors Without Tools
Read your text slowly and carefully. Look for sentences that sound strange or unclear. Check for common mistakes like missing punctuation, wrong verb forms, or repeated words. Pay attention to subject and verb agreement. Watch out for sentence fragments or run-ons. Reading aloud helps catch errors you might miss.
Editing For Clarity And Style
Rewrite long sentences into shorter ones. Use simple words instead of complex ones. Make sure each sentence has one clear idea. Remove extra words that do not add meaning. Replace passive voice with active voice to make writing stronger. Check your tone to match your audience. Clear and simple writing improves understanding and keeps readers interested.
Advanced Grammar Features
Microsoft Word offers more than basic spell check. It includes advanced grammar features that help catch complex mistakes. These tools improve your writing with detailed suggestions. They check style, clarity, and sentence structure. Using these features will make your documents clearer and more professional.
Using Editor Pane For Deep Checks
The Editor pane is a powerful tool in Microsoft Word. It reviews your text beyond simple spelling errors. You can find grammar, clarity, and conciseness suggestions here. The pane highlights issues and explains them clearly. It also offers alternative words or sentence structures. Use it to polish your writing and avoid common mistakes. Open the Editor pane by clicking “Review” then “Editor.”
Integrating Third-party Add-ins
Microsoft Word allows third-party add-ins for extra grammar help. These add-ins check language in different ways. Some focus on style, tone, or even plagiarism. Install add-ins from the Office Store inside Word. After installation, these tools work alongside Word’s built-in editor. They provide deeper insights and catch errors Word might miss. Choose add-ins that fit your writing needs. They make grammar checks thorough and efficient.

Credit: www.tutorialspoint.com
Preventing Future Grammar Errors
Preventing future grammar errors helps keep your writing clear and professional. Fixing mistakes takes time. Stopping them before they appear saves effort and improves your documents. Microsoft Word offers tools and settings that reduce errors as you write. Simple habits also make a big difference.
Setting Language Preferences
Choose the right language for your document. Microsoft Word checks grammar based on language settings. Go to the “Review” tab and select “Language.” Pick the language you use most. This helps Word catch errors specific to that language’s rules. It also avoids confusion with similar words or grammar. Updating language preferences ensures accurate corrections and suggestions.
Regular Proofreading Practices
Proofread your work often. Reading your text aloud helps find mistakes. Take breaks before proofreading to see errors clearly. Use Word’s built-in grammar and spell checker regularly. Do not ignore suggestions; review each one carefully. Keep a list of common errors you make. Focus on correcting these in future writing. Regular proofreading builds strong writing habits and reduces errors over time.
Frequently Asked Questions
How Do I Enable Grammar Checking In Microsoft Word?
To enable grammar checking, go to File > Options > Proofing. Check “Mark grammar errors as you type” and “Check grammar with spelling. ” Click OK to save settings. This activates Word’s built-in grammar checker for real-time error detection.
Can Microsoft Word Fix All Grammar Mistakes Automatically?
No, Microsoft Word detects many grammar issues but cannot fix all automatically. It suggests corrections for common errors, but users must review and approve changes for accuracy.
How To Customize Grammar Settings In Microsoft Word?
Go to File > Options > Proofing > Settings. Here, you can enable or disable specific grammar rules based on your preferences. Customizing helps tailor the checker to your writing style.
Why Is Microsoft Word Grammar Checker Not Working?
Grammar checking might be off or disabled. Verify it’s enabled in Proofing options. Also, ensure the document language matches the proofing language for accurate results.
Conclusion
Fixing grammar errors in Microsoft Word is simple and quick. The built-in tools catch many mistakes for you. Just review suggestions carefully before accepting changes. Practice using grammar check often to improve your writing skills. Clear and correct text helps readers understand your message better.
Keep your documents professional and easy to read. Regularly updating Word ensures you get the latest features. Simple steps lead to better writing every time. Try these tips today and write with confidence.